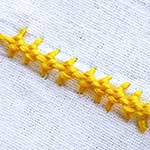
About the Reversed Palestrina Stitch
This stitch is worked similarly to the Palestrina Stitch but in an entirely reversed fashion. We work this from right to left. What was right becomes left, and left becomes right. The top becomes the bottom, and the bottom becomes the top. 😀
How to do the Reversed Palestrina Stitch
I will use a curved stitch line to do this stitch. If you know the Palestrina Stitch, it will be easy to understand its reversed version.
 |
 |
| Fig 1: Bring the needle out through A, which lies slightly above the stitch line. Then, take the needle in through B, which lies on the stitch line below A. Bring the needle out through C, which lies on the left of B on the stitch line. | Fig 2: Take the needle under the stitch A-B without plucking the fabric beneath. Note that the needle is angled below the point C. |
 |
 |
| Fig 3: Now, bring the needle from under A-B, but this time from above point C. Loop the thread around the needle as shown. | Fig 4: Pull the needle out to form the knot. Continue the procedure to create more knots on the stitch line. |
 |
|
| Fig 5: A finished line of reversed palestrina stitch would look like this |
Learn to do Reversed Palestrina Stitch in 2 minutes!
Related Stitches in the Palestrina Stitch Family
|
Mountmellick
|
Eastern Stitch
|
Learn this stitch and 305 other stitches from our 600-page eBook.
![Double knot stitch, Tied coral stitch, Old English knot stitch, Twilling stitch, Purl stitch [EN], Punto de Palestrina [ES], Point de Palestrina [FR], Palestrinastich [DE], Punto Palestrina [IT], Ponto de Palestrina [PT](https://www.embroidery.rocksea.org/images/embroidery/palestrina_knot_index_2.jpg)
![Punto de Sorbello [ES], Point de Sorbello [FR], Sorbello-Knoten [DE], Punto Sorbello [IT], Ponto Sorbello [PT]](https://www.embroidery.rocksea.org/images/embroidery/sorbello_index_2.jpg)


 Sarah has been researching and sharing hand embroidery lessons for over 17 years, making it accessible to everyone around the globe.


Hey
i am making a scrapbook for my bf and i wanted to do borders thru stitching…but my problem was i did not know stitching….and i came across ur site…..and now i m so inspired that as i have time i will practice them…..my mom is going to be happy!!!!!
THANKS for helping
Hi Kanan,
We are happy that our pages have inspired you. 🙂
What I saw here Sarah, is amazing. Your site is going to be really inspiring for all who love and live embroidery.. Thanks.
Thanks Tanusree. 🙂
hello Sarah….
by now u must have understood ,,,that i’m a regular student of urs……today my doubt is that…..whether we can do long arm and long leg in reversed palestrina stitch …like the palestrina stitch..???pls advice……
🙂 I am happy and honoured for having you say that you are a regular student of mine.
To answer your question, yes, you can try long arms and legs for the reversed palestrina. Remember that the ‘knots’ will take only a small portion of the stitch, so you can certainly bring about an effect by making the legs or arms, or both longer. Also remember that as a needlework student, you can be free to experiment with the stitches to see what new effects they can create. 🙂
Please do not publish. I would like to know whether the reversed palestrina stitch (so wonderfully and clearly illustrated on your site – thank you) is the same as what is known as a pearl stitch or knotted pearl stitch. I think it may be. Will be so greatful for your assistance. Regards Steph
Dear Stephanie,
As far as my research goes, pearl stitch and knotted pearl stitch are different from each other and reversed palestrina stitch. Visually, they might look similar, but technically, they are different. I might be posting the tutorials for these two soon sometime.
🙂