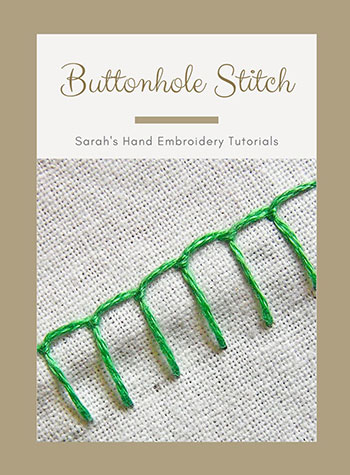
Buttonhole Stitch is also known as
Punto festón [ES], Point de boutonnière [FR], Knopflochstich [DE], Punto ochiello [IT], Ponto feston [PT], Knapphålstygn [SV].
About the Buttonhole Stitch
The Buttonhole Stitch is visually similar to the Blanket Stitch but uses a different method of sewing. Traditionally, this stitch is used to secure the edges of buttonholes as it gives a much sturdier stitch due to the knots it makes. But, over time, it came to be confused with the blanket stitch as these two stitches are used for the same purpose, that is, securing fabric edges.
How to do the Buttonhole Stitch
A Buttonhole Stitch is best done with a slightly thicker thread. I have illustrated this stitch between two horizontal parallel lines. This stitch can be done in any direction.
 |
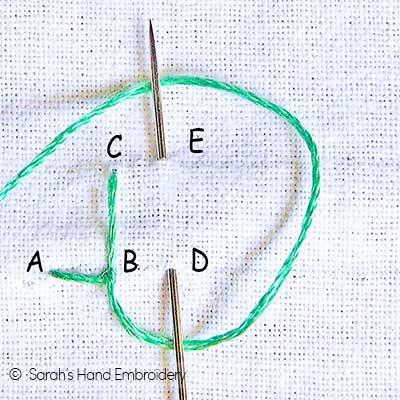 |
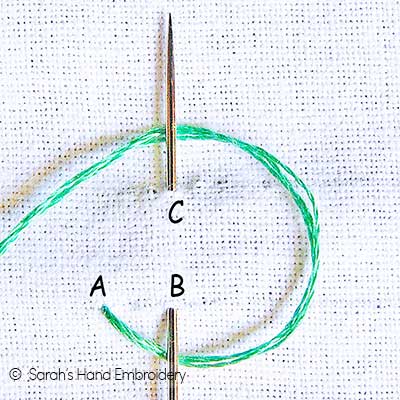
| Fig 1: Bring the needle out through A. Now, pass the needle through B over the thread, as shown. Come out from C. Loop the remaining part of the thread behind the needle as shown. | Fig 2: Pull out the needle towards you to direct the knot towards the bottom. This creates a stitch with the knot on point B. Continue the process. |
 |
|
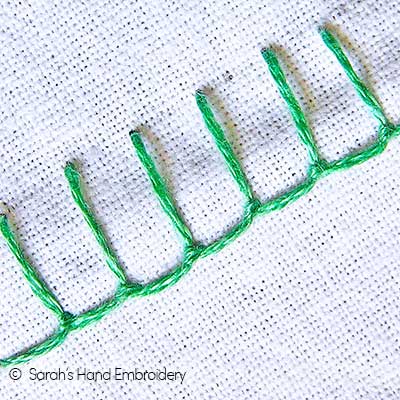
| Fig 3: A finished portion of the Buttonhole Stitch would look like this. A thicker thread would have revealed the knots better. |
Learn the stitches from our Hand Embroidery Book
Learn the Buttonhole Stitch and 200 other stitches through our 450-page Hand Embroidery book.
Related Stitches from the Blanket Stitch Family






 Sarah has been researching and sharing hand embroidery lessons for over 17 years, making it accessible to everyone around the globe.


another buttonhole stititch

So pretty…nice colors too!
Thank you very much
buttonhole stitch

I love this website and all your instructions are fantastic, but the missing picture here makes it really to understand for a beginner. I’ve read your further instructions in this discussion, but I am afraid you’ve lost me. It’s a shame because as other people have said, so many other sources just say that buttonhole is the same as blanket stitch.
Dear Eva,
Thank you. Yes, I realize that the ‘missing’ step is making the stitch difficult to understand. I will try to upload the page with a new set of pictures, including the ‘missing’ step. In the meanwhile, I have changed (tweaked) the existing pictures to make the stitch more understandable (hopefully). Working it this way is much easier to deal with too. Please do try it again with these changed pictures and let me know if it worked! 🙂
Hi Sarah, I found another site as well, I think I get it: the needle gets pulled out but then brought down towards me. The new pictures help a bit more. Thankyou for your reply. Let me reiterate, this is a wonderful resource and thank you some much for this website!
Thank you, Eva. 🙂
I think you missed a step on this one where you bring the needle back to the top. I’m missing how you get it there and make that knot. Everything else has been super amazing and helpful though!
Dear Rachel,
I realize that the extra picture would have been helpful! So, let me try to explain it to you. Even though you are pulling out the needle from the bottom stitch line, you will pull the remaining thread out, pointing the needle away from you. This way, you are directing the knot upwards and it forms on the top stitch line. Note that if you keep pulling the thread pointing the needle towards you, it will not help.
If I am able to add that extra picture, I will do it as soon as possible. 🙂
You know your fantastic with & teaching craft! I live in Australia. Are you able to send an embroidery book to me???
I once had one but we moved and you know what happens. I can’t buy another book like it. Would appreciate your reply.
Hi Christine,
Sorry for a late response. We are right now in the process of making an E-book, which we hope to make available my mid 2018. I don’t have a paper back book yet. I hope you will be interested in the E-book. 🙂
Hi Christine,
Checkout our book store, if you haven’t been there yet. We have a collection of embroidery ebooks over here:
https://www.embroidery.rocksea.org/product/
I’ve looked at only a couple of your tutorials but I can tell I will be coming back again and again as I learn this new craft. I have one question about this stitch: how would you actually use it on a button hole? How close to the cut do you get, which side of the stitch goes toward the hole and which is away?
Sarah, from what little i know of embriodery, this stitch can also be done in a circle. Can you please do a tutorial on that .
Hi Sarah,
Your tutorials are too good. Can you please explain me about the knotted buttonhole stitch please….
thanks in advance… Take Care..
super…..
thank u so mam. i am a student and this stitch was required in my practical exam. u made it easy for completely ignorant students like me
Nice photos desins
I am liked
I hand embroidry
Sarah
Here is my another project with buttonhole stitch for flowers.

I have blogged about it here:
shamiatcraft.blogspot.in/2012/12/blouse-back-neck-embroidery
Thanks for sharing Shami. Nicely done. 🙂
Greetings Sarah ~
I just found your site from pinterest and want you to know I am thrilled to have done so.
Your instructions are well read and pics are extremely helpful, I have not done any stitching in 20 years and am now ready to get back to where I left off.
Thank You very much for your efforts for this educational site. I am bookmarking it.
All the best for you ~
Cheers ~
mindy
Hi Sarah,,,
Thax a lot for the wonderful instruction and step by step guidance…. i m searching for hand embroidery stitches since long…
i m trying this stitch in my dress.. will definitely post.. for ur more instructions and comments… now onwards ur my teacher for embroidery…
once again thnx for all the resources…
regards
Beena
I’m glad to see someone finally showing the buttonhole stitch correctly. So many well known needleworkers/books show the buttonhole and blanket stitch as the same.
The knot on the buttonhole stitch is called a “purl”
When the stitch is worked closely together the purl is more evident as you mentioned and it helps the buttonhole on a tailored suit to wear better.
The purl (or knot) is an excellent place to add a bead.
The bead will be locked in by the stitch and won’t move around. I’ve done it with seed beads and it almost looks like a fancy zipper. It makes a wonderful decorative stitch for crazy piecing.
Thank you for a wonderful stitch dictionary.
Dear Susan,
Thank you for detailing out and adding on to the information. 🙂
Sarah,
Thank you so much! I looked at maybe 10 different sites to better understand this stitch. Yours are the best instructons.
Wonderful resource!
Thank you Bela. It is nice to know that you were able to follow our instructions to learn this stitch. 🙂
Sara,
My next try with buttonhole and stem stitch on a chudi tops. Have a look at it.

My blog post regarding this is under this link
http://shamiatcraft.blogspot.com/2011/12/buttonhole-stitch-embroidery.html
Shami Immanuel
Really neat Shami. I remember me having done such flowers years back. You brought back those memories. 🙂
Sara
I have done a project using buttonhole stitch and fly stitch. Please do have a look at it.
My completed project of a churidhar tops is on my blog.

The link is
http://shamiatcraft.blogspot.com/2011/12/fly-stitch-and-button-hole-stitch-in.html
Dear Shami,
Thanks for sharing your works with us! 🙂 It is really nice to see how you have used the buttonhole stitch. I particularly like the way you have done the snowflakes inside using fly stitch.
At the moment, I am not able to comment on your pages. I will try to sort out the problem asap.