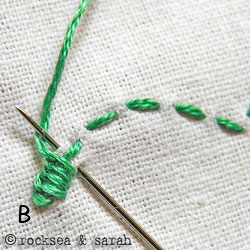
Blanket Stitch Scallops is also known as
Point de feston dentelé [FR].
How to do the Blanket Stitch Scallops
This stitch uses the blanket stitch to make half-moon shaped shapes. Usually, it is done as an edging stitch. After making the blanket stitch scallops, the outer side of the fabric is carefully cut away, leaving the projected (convex) part of the scallops to edge the fabric.
You need to know the Running stitch and the Blanket stitch to be able to continue with this tutorial.
 |
 |
| Fig 1: Begin by making a waved row of the Running stitch. This running stitch will provide a base to work the Blanket stitch over. The running stitch runs from A to B. | Fig 2: Now, turn the fabric around. Our Blanket Stitch will now begin from the other end of the running stitch row, that is, B. When doing the Blanket Stitch, keep the Running Stitch in between and take the needle in and out as close as possible to the running stitch. |
 |
|
| Fig 3: A finished portion of the Blanket Stitch Scallops look like this. If this stitch is used as an edging, the top fabric (fabric above the projected part of the scallops) can be cut away carefully, without damaging the stitches. |
 Sarah has been researching and sharing hand embroidery lessons for over 17 years, making it accessible to everyone around the globe.


Sarah…so glad I found you! I have two questions for you:
1, what is the best way to make your scallops even? Do you use a template?
2. When you say ‘projected’ part of the scallop, do you mean the edge where the needle is coming out in image 2?
Hi Lynn,
Thanks for using our tutorials, and we welcome any queries.
1. The best way to make the scallops even is to use a template. In the illustration, I had used a template to draw over the fabric and stitched the running stitch over it.
2. Yes, the `projected` part of the scallops is the area where the knots of the blanket stitch falls. Sometimes, it is a little tricky to explain the pictures in words! 😀
It's reali nice Sarah.TQ veri much
What a wonderful website! I just found you via Pinterest. Thank you for all the work to put this together. It’s a great tool!
Nice work. Thanks for sharing, Shanthi. 🙂
Sarah,
My work, button hole scallots for edging….:-)
Thanks Raji 🙂
This will inspire many.
Dear Sarah,
Just check my hands on of this stitch at threadwithme.blogspot.in/2012/06/blanket-stitch-scallops, when time permits.
Thank u so much for your wonderful tutorials.
Raji.
🙂 Sowmya.
Dear FlowerLady Lorraine, and Ann,
Thanks. We are happy that our pages have helped you. Do share some of your works to share with others. 🙂
Sarah,
Thank you for this wonderful site. I am a long-time embroider, and am fascinated by Indian embroidery. I have many pieces of clothing and other embroidered items such as pillow covers and wall hangings, many of which are very old embroideries “saved” by taking the pieces which are still usable and combining them. I have begun learning how Indian embroidery is done and was so happy to come across your wonderful tutorials. I would love to see more tutorials on how the wonderful motifs from various parts of India are combined and the stitches used.
What a joyful and educational way to spend an afternoon!
I wish I had come across this site before I did a wall hanging to sort of imitate some I already owned, using stitches and ideas of my own, but all Indian inspired, using colors to match my wool carpets.
Thank you, again,
Ann
I am so happy to have found you today. I’m working on TAST 2012 stitches, and looked up the barred stitch and came to your blog. Then I looked further in your blog and found exactly what I needed, the whipped wheel stitch that has had me stumped and frustrated. It’s easy. But for some reason I just wasn’t getting it at all. I am so far behind in the stitches. Now maybe I can get caught up. 🙂
I have bookmarked your blog. Your stitches are lovely and very well explained, your pictures great!
Thank you again for your tutorials.
FlowerLady Lorraine
Superbbbbb………!!!!!!!!! 😀