This type of pattern darning will give you an equally good reverse side, if not the same. It is used on fabrics that are used on both sides, like towels and napkins. Here we have to be careful about how to choose the pattern and go about stitching it.
I will demonstrate by stitching a border pattern with a horizontal stitch.
1. Fabric and thread
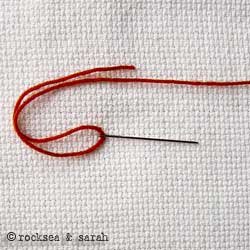 | I have chosen aida (11 counts) fabric for the project. I used wool so that the pattern gets good coverage. |
2. Choosing the pattern
In order to achieve a reversible pattern, I have two things to keep in mind:–Choose a pattern I can stitch horizontally. This will keep the top and bottom of the edges neat.
Start each new row with a new thread. This will avoid me from finishing out with the thread mid-way, thus keeping the reverse side neat.
3. Planning the pattern
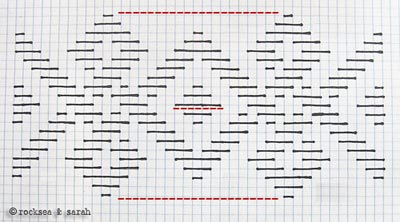 | |
| The horizontal graph image of my pattern will look like this. But, I face the problem of having long stitches. Those areas are marked in red. So, I will make some minor changes to keep the stitches within the 5-square limit. This will ensure a less ‘dangling’ stretch of stitch on either side. | |
4. Making the pattern workable
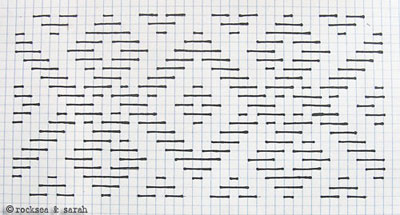 | |
| Here are the changes I made to rectify the area marked in red:–On either edge, I have made an addition to the pattern to break down the long stitches that would have occurred in the rows on the reverse side. I have also made a gap in between the diamond so as to break the long stitch in the front side into two smaller stitches. | |
5. Beginning and ending
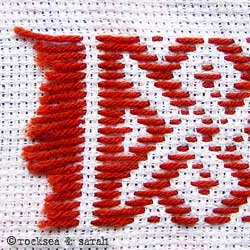 | |
| I now begin to stitch on the fabric using the wool. Each intersection of the graph line would be each stitch point. I take each row at a time and each new row is started with a new thread. And so, the ends would look like this. This end would be then be sewn between the hems. | |
6. The finished pattern
 |  |
| The front and the reverse would look like this 🙂 | |
Next, go to the other tutorials of Pattern Darning:


 Sarah has been researching and sharing hand embroidery lessons for over 17 years, making it accessible to everyone around the globe.


Wow!! I loved it. I think this is how they do Toda embroidery in south.
I have been fancying the Toda Embroidery for a while now. I hope to make a tutorial soon!
Thank you, Mukta.
Is this the same as Kogin embroidery? Do you know where I can find patterns?
Hi Dee,
I must say this is a Kogin Embroidery Pattern. I usually just google for the patterns. 😀
Love looking through your site! Thank you for sharing.
I see that you use Aida for embroidery and wonder if you have ever done Swedish Weaving on the Aida??
It’s done using either embroidery floss or perle cotton. The designs do not go through to the back and are stitched only under the floats in various designs.
Hi Marny,
I remember my mother doing the Swedish Embroidery almost 40 years ago, and that is because the fabric that supports the embroidery was easily available then. I did try to attempt the Swedish Embroidery on that fabric, but never really attempted on the Aida. Should try sometime. Thank you for the inspiration! 🙂
Wow that was simply superb. Ur tutorials very nice and in detail.thank u.
Wow that was simply superb. Ur tutorials very nice and in detail.thank u.
Thank you, thank you, thank you. I love your tutorials. I have learned so much. You are wonderful to share this with us. It has been a great amount of work for you. We appreciate it.
Dear Sarah,
Many congratulations for your work.!
You might have certainly motivated every reader to pick the needle and thread with the kind of work you have exhibited…on your site to start embroiderying.
I am soon going to do cushions…!
Many thanks for having the heart to share all your work
God Bless you..!
Nazneen
Pune 🙂
you are simply great your explainations are crystal clear .when are you going to post huck embroidery lessons?
if i need to do it on my dress hemm, like ordinary cotton materiel how should i do? is it possible?
I passed through your site and i can still remember when i use to do cross stitch. I do big ones to watches then frame them after. Haha my mom will even pay me to do a piece for her.. That was really fun to spend my vacation from school. I wanted to find time to do it again i think it can really lessen the stress from work.. thanks Sarah for sharing this..
Bonjour Sarah
thank you very much for all your tutorials
can you tell me please if there is a book
with all Indian embroideries with explanations ?
thanks
have a nice day
Bonjour Maggy
I am not quite sure if you can find any book that explains techniques of all the Indian embroideries. However, I can suggest a book that can give information of many traditional embroideries of India. It is:
‘Traditional embroideries of India’ by Shailaja D Naik.
It won’t teach you techniques, but will certainly give you an insight into each embroidery.
beautiful pattern. thanks for the very clear tute. will try to copy this on a dress hem soon.. 🙂
Dear Jaya,
Thanks! Do let me know when you are done with your project. Would love to know how it came out to be. Best wishes.
sarah thanks a lot dear. you are awesme 🙂
🙂 Thanks Siji.
hey em a hand embroider worker i can make all of dezines sequence,stone,thread,diamonds, i m just looking a job out side of my country like foreign i live in pakistan but our salary is very minimum thats y i wanna work in foriegn country i can earn money save and make my family happy and proud so if u have any job or any one of ur colleagues want a worker so kindly reply me at my mail shazy_roy@yahoo.com thanks
Hey Sarah …
You have very elaborate instructions here. 🙂
I had some piece of work on aida fabric. I guess that also is a version of pattern darning. Do have a look. I didn’t know what that was called until I saw the instructions in your website. 🙂 I have provided the link to your instructions in my blog.
http://pinch-of-this-n-dash-of-that.blogspot.com/2009/11/pattern-darning.html
Dear Srilatha,
I checked your page….the design is nice. 🙂
But I will have to correct you. What you have done is not pattern darning. It is a typical Bargello stitch (Florentine work). Bargello patterns are wavy and use different colored threads. Pattern darning is done with a single colored thread, row by row.
I will be posting bargello stitch in future as it is lined up in my tutorial. It will carry more information on it.
Hope I have clarified. 🙂
Hey Sarah ..
Thank you for the info. Now I know what it is called 🙂 . I didnt know it had a Hi-Fundu name 😛 . I googled and found out it’s an ancient Italian embroidery . Waiting for your tutorial for more info.
I’ve been trying from quite some time to comment on your page!! For some reason it doesn’t load ; and finally when it did I cannot see the pics here …
well, I guess it is some temporary technical reason. Some updations and all…you should be able to see the pcitures now. 🙂
-i am trying to comment on your page, but I am not able to
🙁
No clue why 🙁
Simply Wonderful!!!
🙂
Hey Sarah…
Is Aida fabric similar to cross stitch fabric that you get in India???
This is a nice patttern. Though it seems to be easy, it needs to be done carefully !!
Dear Srilatha,
Yes, aida is the cross stitch fabric you get in india. We can call it an ‘even weave’ fabric to make it easier. 🙂
Oh, pattern darning is as simple as it looks. But, we have to be aware of the tips and techniques to bring it out correctly, so that is all I mentioned in the lessons. 🙂 I hope you don’t get intimidated by the exstensive ‘theory’ part!