Russian Chain Stitch is also known as
Punto de cadena rusa [ES], Point de chaîne russe [FR], Russischer Kettenstich [DE], Punto catenella russo [IT], Ponto da cadeia russo [PT].
How to do the Russian Chain Stitch
As the name suggests, this stitch is found in Russian embroideries, usually along with the basic chain stitch. It is made by grouping together three lazy daisy stitches, in a clover shape. Ideally, the first Lazy Daisy loop would point upward. Since this is a motif stitch, it is good for borders. So, when you make horizontal borders, the stitches are placed one on the side of the other with the first Lazy Daisy pointing upwards. When doing a vertical border, they all fall below one another, but again with the first lazy daisy pointing upward. Of course, I suggest a lenient approach to using this stitch.
I will be doing this stitch in reverse order since it is easier to stitch this way. (So, you will see the first lazy daisy pointing downwards). I will work on a vertical border, over three parallel stitch lines. You need to know at least the Lazy Daisy Stitch to be able to follow this lesson.
 |
 |
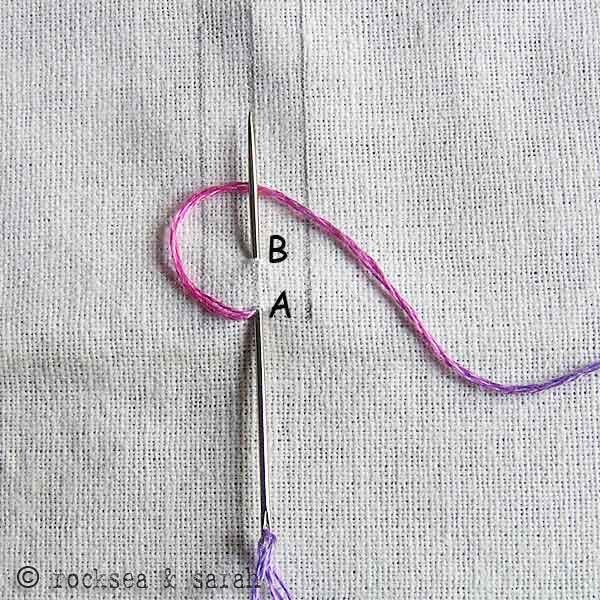
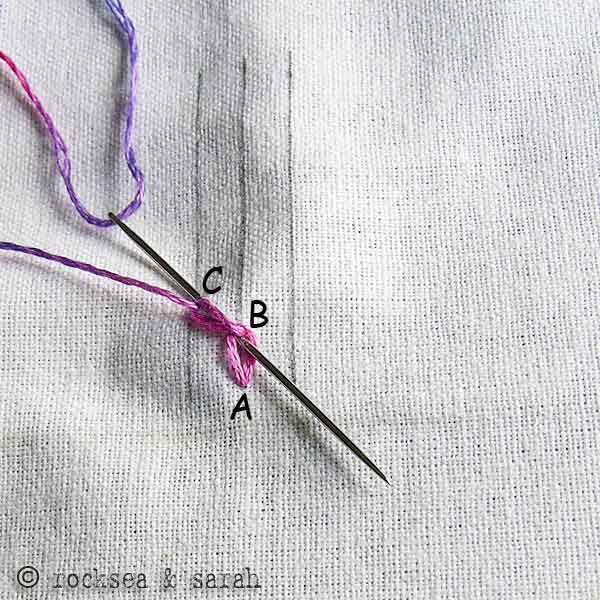
| Fig 1: We begin by making the first loop by bringing out the needle from the second stitch line at a point A. Put the needle back in A and bring it out from B. Loop the thread around the needle and pull out the needle. | Fig 2: Now, we make the second loop by putting in the needle back in B and bringing it out from C, which lies at an angle on the first stitch line. Loop the thread around and pull the needle out to make the second loop. |
 |
 |
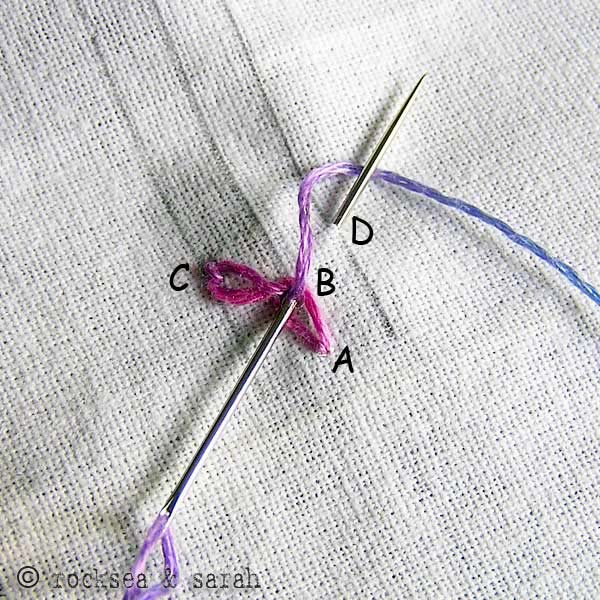
| Fig 3: Anchor up the Lazy Daisy loop and bring the needle out from B | Fig 4: Similarly, we make the third LazyDaisy loop, but this time towards the right side, with D lying at an angle on the third stitch line. |
 |
 |
| Fig 5: Once finished, the clover-shaped Russian chain stitch would look like this. As mentioned before, this is in an upturned position. Ideally, the first loop should point upwards. | Fig 6: A series of vertical Russian chain stitches would show up like this (reverse order). You can choose to close them in or space them out. |
Learn to do Russian Chain Stitch in 2 minutes!


another stitch


I have a friend in Russia who just bought a house. I want to make him an embroidery piece that says Home Sweet Home in Cyrillic. Would this be something appropriate and is there a pattern I could get to do that.
Hey Donna,
Sorry for being late. It is summer here and I was on a long vacation with my kids sans the internet. If it is not too late for a response, I would suggest that you do the writing in back stitch or chain stitch and use the Russian stitch to create a border or frame.
Thank you for this, and all your wonderful tutorials. I see stitches on your site that no one else ever shows. Thank you, thank you!!
Hi! Great work!!!. Thanks a ton for the tutorials.
hi,
Accidently i reached in this site. Am new to this field. I want to learn more about this hand works and i want to design my own dresses. Can you help me.
Hi
i love ur works how intrestingly u disply ur awesome u made everything superp. congrs
I just wanted to thank you for these clear and generous tutorials. I’m just beginning my journey into fibre arts and wanted to learn some stitches.
WaahN Thank you thank you! We have this cross stitch for our periodic long quiz and project . I found this website what a big help!:) Thank youu im doing this russian chain stitch now its hard at first but my mom helped mo so it’s all okay now:D Thank youu^___^
Good one yaar.. Great work…
Hi Sarah
i want design patterns so please can u send me
like doll,nature,cartoon
Great work!!! Beautiful photos.
Regards
🙂 Thanks Sangeetha.